Thursday, June 12, 2008

Eye cosmetics and make up


Cleanliness and hygiene should be followed when using eye cosmetics or it can lead to some infections of the eyes. It is not good to borrow or lend any eye make up and it is best to always keep your hands clean while using eye make up.

Eye Shadows

Eye shadows leave a shiny or opaque finish depending on the time of make up and shape of eyes. To achieve the perfect daytime look with eye shadow, you need to follow some basic guidelines. The basic tones you need are
(a) a pale highlighter shade for your brow bone area.
(b) a basic shade for your eyelids.
The shades you choose can be deep-toned or pale, neutral or bright, but they should be applied so that they are not too strong. Blending is important while applying eye shadow. The colour used should be appropriate to the colour of the skin and match the colour of the dress. When you use more than one shade they should be so well blended that you can't tell where one ends and the next one begins.

Forms of shadows:
Eye Shadows come in a variety of forms like pressed powders, pencils, sticks, gels or creams. Pressed powders are the most popular form of shadows. They are available in pearly and matt textures. You can get a better effect, if you apply them with a wet brush. The cream shadows are oil or wax based. It is best suited for dry lids and should be avoided on greasy eye lids. Pencils have a high colour and filling ability. Gels are suited for oily skins.

Brushes for application:
A straight - bristled brush for each colour and a round bristled brush for blending.
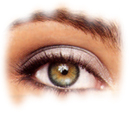
Application:
When you apply eye shadow, always start with the highlighter shade. Brush it just under the outer end of each eyebrow and quickly blend the colour inward toward the inner end of the eyebrow, above the inner corner of the eye. After that apply the eyelid shadow by beginning in the centre of each lid, just above the pupil of your eye. With a blending brush, make a quick back and forth motion. Finish the make up by blending upward to meet the highlighter shade.
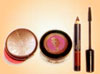
Eye liner

Eye liners are the most extensively used form of eye make up. Eye liner is used to make the eyes more prominent and create an illusion of thicker lashes. Eye lining is done with a black or brown eye liner on the top lid of each eye and sometimes under the lower lashes. The line should be smooth instead of a harsh line.

Forms of liners:
Eye liner comes in liquids or pencil form. Care should be taken when using liquid eye liner. It should not go into the eyes. Liquid liners can be either water based or alcohol based. Alcohol based liners are water proof.

Application:
To apply liquid eye liner, draw the brush out of the bottle or tube and stroke it against the mouth of the tube to remove excess liquid and taper the brush to a fine point. Using the very tip of the brush, stroke the eyeliner evenly across the lid as close to the base of the lashes as possible, beginning with the inner corner of the eye and continuing to the outer corner of the eyelid. Apply the line in several short brush strokes.

Indians have our own indigenous type of eye make up -kajal. Home made Kajals does not contain any chemicals.

Eye defining pencil

Eye defining pencil adds definition and a hint of colour to the bottom of each eye. It is available in variety of colours. The pencil should have a fine point and a medium to soft lead so it glides on easily under the lower eyelashes.

To apply eye defining pencil, lightly stroke a single, fine line under the lower lashes starting at the outer corner of the eye. The line must be close to the base. Run the pencil smoothly under the lashes along each lower eyelid to the inner corner of the eye. Then use an angles brush or a cotton swab to soften and blend the line. Eye defining should be never be a hard, thick line.

Eye brow Pencil

An eyebrow pencil emphasizes the eye brows, improves their shapes and makes them look thick. The colour of the eyebrow pencil should never be darker than that of your brows or hair colour.

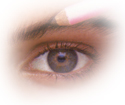
To apply eyebrow pencil, brush your eyebrows with a eyebrow brush to remove excess foundation or face powder. Then with outward brush strokes, smooth the hairs in the direction in which they grow. To shape your brows properly, begin by using short, light strokes of the pencil to outline the top of each eyebrow up to its arch. Use featherlike strokes to extend each brow to the end. Fill in any sparse areas by using these same strokes. Then brush your brows with an eyebrow brush to smooth them and blend in the pencil strokes.

Mascara

Mascara thickens the eye lashes and increase attractiveness of the eyes and emphasize them. It gives the eye make up the finishing touch. Brush the lashes, apart from application. Light coats are better than thick ones.

Forms of Mascara:
There are 3 different forms of Mascara - water based, water proof and the mixed variety. Mixed variety is the the most useful one. Water based mascaras can be applied quickly and removed easily. So they are gentle to the lashes and eyes. But they won't stay for a long time, as the mascara smudges easily when it comes into contact with water, tears and perspiration.
Water proof variety stay for a long time and is water proof and smudge proof. They are a good investment as they are resistant to contamination and can be used even years after they have been manufactured. But it takes a long time to dry and is difficult to remove the liner. The mixed variety is a combination of water based and water proof mascaras. These dry quickly and is easy to remove.

Application:
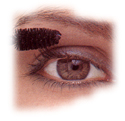
Apply mascara by looking straight into the mirror, with your chin lifted slightly so you can see your lashes clearly. Gently twist the spiral brush as you withdraw it from the masara bottle. Stroke your upper lashes evenly from their base to the tips, curling them upward with the brush as you apply the mascara. Apply mascara to the lower lashes with downward strokes, wiggling the brush back and forth a bit to separate the lashes. After you have applied the mascara to both eyes, you can repeat the application to add more fullness to your eyelashes.

Under eye concealers: They are intended to hide blemishes and dark circles under the eyes. Application of make up above them, does not remove them.

FOUNDATION

Foundation should be considered as a skin improver. Foundation should match your skin tone. To choose a colour apply little on your cheek or inside of your wrist. Be careful to blend around nose and chin and fade away under the chin. Heavy foundation is old fashioned and ageing. Foundation should never appear like a mask. The shade chosen should be as close to your natural skin tone, so that there is no sudden change of colours between Chin and neck.

Different types of foundation

Foundations are available in various forms liquids, gels, creams, solid creams, in sticks (pen stick), 
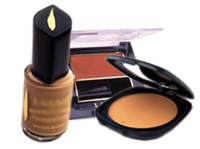
cakes (pancakes). This can be chosen depending on how much clarity or cover you prefer.

Emulsions : These are packaged in tubes and are formulated for a variety of skin types- for dry skins, oily skins and normal skins. This gives less sheen than cream or liquid foundations, but cover blemishes very well.

Creams: These are packed in jars. As they contain a high proportion of oils, they are particularly suitable for dry skins. These also provide a heavy cover, but gives a glossy finish.

Liquids: These are packaged in bottles and can be formulated for all skin types. They give a light sheen cover but are too light to cover any blemishes and scars.

Gels : These are packaged in squeeze tubes. They give a light, natural look and are the variety you should use if you have a blemish free normal skin.

Cakes or sticks : These are the solid forms of foundation. Since they have a drying effect, use them on an oily skin. They hide blemishes and scars. Solid forms are popular for photographic and stage work but are too heavy for every day use.

Powders : The original full coverage face-powders have now given way to transparent powders; these transparent powders control shine and provide oil - blotting. They are used after foundations to give a matt finish. Cake or compact powders are more heavily formulated; as they contain a certain amount of foundation. These are not the best choice for the initial powdering over foundation because they may rub the foundation off and also cause an unattractive colour build-up. They are best used for touching up during the way, as they help to reinforce coverage.

Choice of a foundation

Two aspects should be taken into account before choosing a foundation - the form of the foundation and its colour. Some forms are more suited to certain skin types than others. Age and the basic condition of your skin also influence the choice of the foundation.

Choice based on the skin type:

An oil based foundation is most suited for dry skin as this gives additional moisture. An oil -free, water based foundation (Cake or stick form) is most suited for oily skin. Any form of foundation is suited for the normal skin type especially, Emulsions and liquid foundations which can be used for any skin type.

Choice based on age and condition of skin :

For young and fine skin, a thin foundation (light sheer liquids) is most suited. For a skin with uneven colour and tone, blemishes etc a heavy foundation (cream of stick) is suitable, to cover the poor condition of the skin. For older skin, 2 coats of light liquid foundation is suitable- a heavier foundation may emphasize the lines and skin creases.

Choice based on Colour :

A make up base or foundation must match the natural skin tone of the person as much as possible. This colour matching is best done in day - light and not in artificial light. A fair skin can use Beige, brownish gold or ochre and darker skin can use pinkish beige, peach or pinkish ochre. If there are more than one colour tone in your face, then match the foundation to the middle tone. Mixing two colours -one which matches your skin and the other which complements your natural colouring could have very good effect.

Powder

A shade close to your skin colour should be used. Powder is not really meant to add colour, but it helps to add a smooth finish. Apply with a bushy brush or with cotton and dust off excess powder.

Blusher or Rouge

After facial make up, the next thing that comes on the face is the blusher. Blusher can be in powder form as well as cream form. The colours should not be very much darker than your skin tone. Smile widely with your lips closed. Your cheek naturally raise; apply rouge on the raised area and fade out gradually towards the hairline. Never apply rouge too close to the nose and too low on the cheeks.

For pimples

For Black Spots

For Glowing skin

  • A facemask of egg white and honey gently removes the tan from your face.
  • Mix oats with honey, yogurt and ground almonds. Apply this in your face, leave it for five minutes and wash with lukewarm water.
  • Cucumber is a natural cleanser. Mix cucumber juice with milk and use it instead of a cleanser.
  • Take 1/3-cup cocoa, three teaspoons of heavy cream, 1/3-cup ripe papaya, 1/4-cup honey and three teaspoons of oatmeal powder. Mix it all together. Apply on your face. After 10 minutes, wash your face with warm water. This is best for oily skin
  • For oily skin, apply a mixture of grapes, lemon and egg white. Leave it for 20 minutes and rinse with warm water. While lemon acts as a natural cleanser, grapes will soften your skin and egg whites will tighten it. Don’t be alarmed if your skin tingles.
  • Cut the lemon and rub the wedge all over your face. Leave it for about 20 minutes, then rinse off with cold water. This will refresh your face. Avoid doing this if you have dry skin.
  • Mix honey, lemon and vegetable oil .This mixture is a good moisturiser for dry skin. Apply this mask for 10 minutes.
  • Apply the mixture of honey and milk on the face . This will make your skin glow.
  • Prepare a mask by mixing a slice of pumpkin with egg yolk and milk. Let this mask set on your face for 30 minutes for a glowing skin.
  • Mix half-a-cup honey to your bath water for soft and smooth skin.
  • For a soothing body pack, prepare a paste of mint leaves and almonds. Mix it with warm water and apply all over your body. Leave it till it dries and rinse with warm water.
  • Buttermilk dabbed on skin for 15 minutes will soak up oil from your skin without drying it.
  • Carrot juice applied daily fades blemishes.
  • For dark underarms and neck apply lemon juice mixed with cucumber juice and a pinch of turmeric daily. Leave this on for 20 minutes.
  • For removing facial hair.. Apply a sticky paste of egg white blended with sugar and corn flour. When it dries, gently peel it off. Repeat this three to four times a week.
  • Thin apple slices rubbed onto oily skin will help in controlling oily shine.
  • For supple skin, apply a ripe smashed banana on your face for 20 minutes daily.
  • Cauliflower juice applied on warts regularly will make them fall.
  • For a fair skin, try this natural bleach. Mix orange peels (sun dried and powdered) with milk. Apply this paste for 25 minutes and wash off.
  • Mix half teaspoon dried curry leaf powder with multani mitti (fullers earth) and apply on the face. Wash it after it gets dry.
  • Apply the mixture of tomato juice and honey on the face and neck , wash it after 15 minutes.
  • Apply the mixture of carrot juice and basin. Leave it till it dries and wash the face.
  • Add two teaspoon of tomato juice with 4 teaspoon of curd and apply on the face.
  • Add a pinch of yeast with 2 teaspoon of cabbage juice and apply.
  • Mix 1 table spoon of barley powder with half teaspoon of lime juice and 1 teaspoon of honey. Apply it on the face and wash after 20 minutes.
  • Mix pineapple juice and carrot juice together and apply it on the face and wash it after 15 minutes.
  • Mix vinegar and rose water in equal quantities and apply.
  • Mix curd and cucumber juice and apply it on the face.
  • Apply the mixture of coconut water and thick pineapple juice.
  • Make a paste with 1/2 teaspoon of milk powder, 1/4 teaspoon of egg white and 1/2 teaspoon of lemon juice and apply on the face.
  • For dry skin, Make a paste with egg yolk, olive oil and lemon juice. Apply it on the neck and face, wash it out after 10 minutes.
  • For oily skin, take a mixture of oatmeal and egg white and apply it on the neck and face
  • For glowing skin, use basin or green gram powder mixed with milk instead of soap.
  • Apply the mixture of raw turmeric and cream of milk on the face and wash it after 20 minutes. It will make your skin fair.
  • Apply the mixture of honey, basin, cream of milk and olive oil as a face pack.
  • Apply the paste of fenugreek with milk on the face and let it dry. Wash off with luke warm water.
  • Make a paste of red sandal wood and apply it on the face every day for glowing skin.

  • Make a paste with red sandal powder and coconut milk and apply on the face for soft skin.

Lip Care

  • You can mix one-tablespoon cranberry sauce juice with two tablespoons Vaseline for a delicious home made lip balm.
  • Apply the juice of lemon skin for avoiding black colour of lips
  • Massage your lips with coriander leaf juice for soft and rosy lips.

Eye care